
Complete Protruding Eye Shape Guide
Learn about protruding eye shape causes, diagnosis, and treatment options at Cape Cod Plastic Surgery with expert insights from Dr. Marc Fater.
Nov 28, 2025
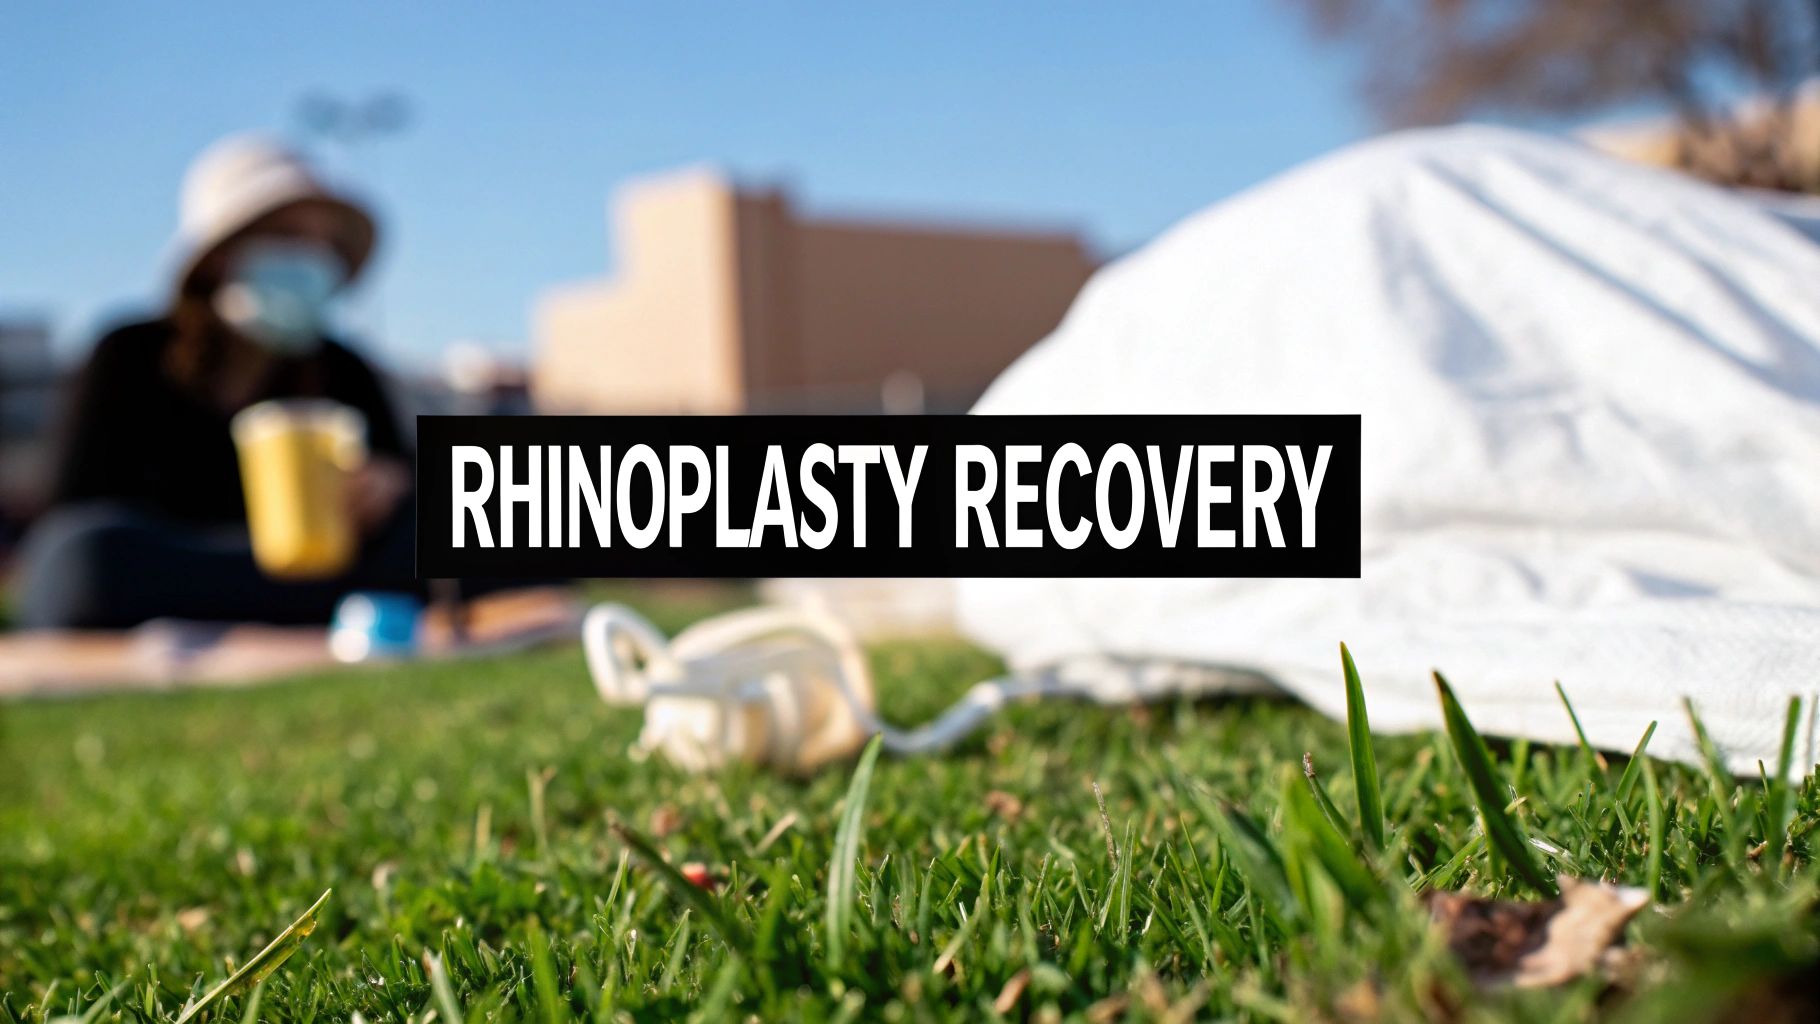
The first question on every patient's mind is, “What is this recovery really going to be like?” It’s a great question, and the honest answer is that it's a journey of patience. Think of it as a phased process where the initial discomfort and puffiness slowly but surely fade, revealing the beautiful, refined nose you envisioned over the course of about a year.
Getting a rhinoplasty is an exciting step, but knowing what to expect afterward is what will make you feel confident and in control of your healing. I always tell my patients to think of recovery not as a sprint to the finish line, but more like a marathon with very distinct phases.
The first part of your journey is all about rest and managing the immediate side effects. Later on, it's about watching the final, subtle contours take shape. We’ll send you home with a clear, detailed plan to guide you—much like the effective discharge summaries used to ensure patients have everything they need for a smooth start.
Having the right mindset is half the battle. Rhinoplasty recovery isn't an overnight transformation; it’s a gradual process that takes about 12 months for the final result to settle in.
While the most obvious swelling goes down in the first few weeks, a little bit of puffiness, especially at the tip of your nose, can stick around for up to a year. Bruising is much quicker and is usually gone within three weeks. It’s a complex procedure, but the average success rate is around 80%, and that number gets even better when you're in the hands of a specialist.
To give you a clearer picture of the road ahead, let's break it down into a few key stages:
Understanding these milestones helps you appreciate that every day is a step closer to your goal. For a deeper dive into what you should know before your procedure, be sure to read our complete rhinoplasty patient guide.
To make this even clearer, here's a simple table outlining what you can expect at each stage.
This table summarizes the key stages of recovery, helping you quickly understand what to expect at different points in your healing journey.
Remember, this timeline is a guide. Everyone heals at their own pace, but this gives you a reliable map of the journey ahead.
The first seven days are, without a doubt, the most important part of your rhinoplasty recovery. This is your day-by-day playbook. Your only job during this time is to rest and give your body a calm, protected space to begin its incredible healing work.
Think of this week as building the foundation for your final result. When you know what's coming each day, you can move through this initial phase with confidence. Swelling, stuffiness, and bruising aren't just normal—they're the signs that your body is doing exactly what it's supposed to.
On day one, your main focus is simple: rest. You’ll probably feel quite groggy from the anesthesia, so plan on making your bed or a comfy couch your home base for the day.
You'll go home with a splint or cast on the outside of your nose, which is there to provide crucial support and protection. It's also completely normal to feel very "stuffy," almost like you have a bad head cold. This is just from the internal swelling and will get better. Right from the start, keep your head propped up on two or three pillows, even while sleeping, to help keep swelling to a minimum.
This is when you'll likely see the most swelling and bruising—usually around the 48 to 72-hour mark. It's very common for bruising to show up under your eyes, giving you that "black eye" look. This is temporary and a totally natural part of the healing process.
Keep up with your routine of rest and elevation. You can gently apply cool compresses to your cheeks (but never directly on your nose) to soothe the area and help with the puffiness. Now is the time for soft foods that don't require much chewing. Think yogurt, soups, and smoothies. This helps you avoid putting any unnecessary strain on your healing face.
As you get into the second half of the week, you'll really start to notice a change for the better. The swelling will begin to go down, and the bruising will start to fade, often changing colors as it heals.
Any significant discomfort you felt in those first couple of days should also ease up quite a bit. Towards the end of this week, you’ll have your first follow-up appointment with Dr. Fater. This is a big day because it’s usually when we remove your external splint. It will be your first glimpse of your nose's new shape, though it will still be quite swollen.
"Patience is your most valuable asset during this first week. Each day brings visible progress, and by focusing on rest and following your care instructions, you are actively contributing to a better, faster healing process and a more beautiful final outcome."
This visual timeline helps illustrate the bigger picture of your healing journey, from these early days to the final, refined result.
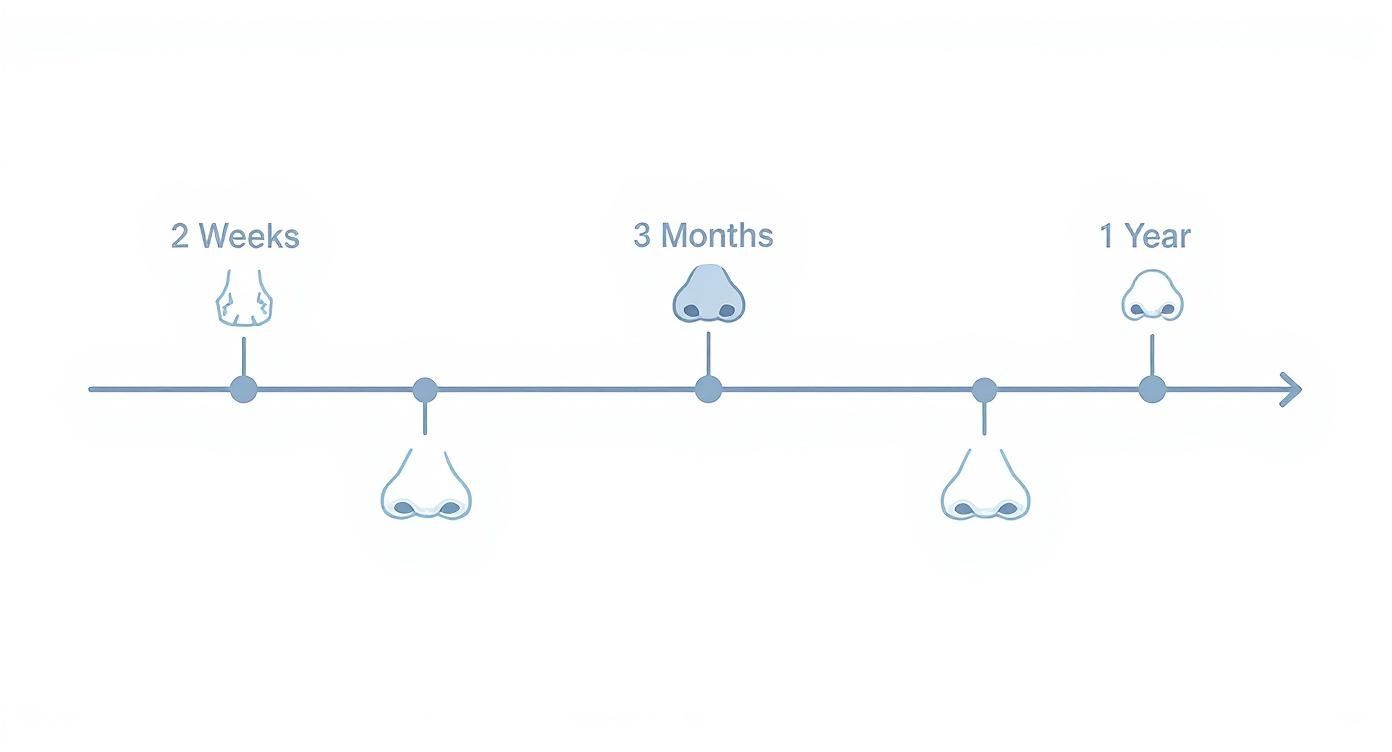
As you can see, your healing journey continues long after this first week, with the most significant refinements happening over several months.
It’s also crucial to remember that everyone heals differently. Your personal timeline might vary depending on the specifics of your surgery. For example, a less invasive closed rhinoplasty often means a quicker initial recovery of about one week with minimal bruising. In contrast, open and revision rhinoplasties can require two to four weeks for that initial, more intense swelling and bruising to subside. You can learn more about how different rhinoplasty techniques affect recovery to get a better sense of what to expect.

As soon as your surgery is over, your body kicks into high gear to begin the healing process. This natural response involves some swelling, bruising, and discomfort. I want you to see these not as problems, but as positive signs that your body is doing exactly what it's supposed to do.
Think of it like this: swelling is your body’s own construction crew rushing to the site with all the necessary materials for repair. Bruising is just the visible evidence of that work happening under the skin. Understanding this helps you see these temporary effects with confidence, not worry.
While everyone heals a little differently, the timeline for swelling and bruising is fairly predictable. It might look a bit dramatic at first, but I assure you, it gets better day by day.
It's important to know that while the majority of swelling is gone within a month, a small, subtle amount can stick around for much longer. We call this "residual swelling," and the nasal tip is always the last place for it to resolve. It can take up to a full year for this last bit of swelling to go away and reveal your final, refined result.
Healing is a process, but you're not just a passenger. The things you do in the first couple of weeks can make a huge difference in your comfort and how quickly the swelling and bruising resolve.
I'll give you a specific plan that includes a schedule for your prescribed pain medication. It's really important to stay on top of this for the first few days to keep discomfort at bay. As you feel better, you’ll find that over-the-counter options are all you need. We have a detailed guide on effective pain management after surgery you can review. For localized tenderness, some patients find that a compounded pain cream for discomfort can also be helpful.
Your two most powerful tools for managing swelling are simple but incredibly effective: elevation and cold compresses. Keeping your head propped up on two or three pillows—even while you sleep—uses gravity to help drain fluid away from your face.
Applying gentle, cool compresses to your cheeks can also bring a lot of relief and help reduce puffiness. Just be sure to never put them directly on your nasal splint. Your commitment to these simple steps will have a direct, positive impact on your recovery.
Feeling "stuffy" is one of the most common things patients mention after rhinoplasty. This congestion is caused by internal swelling, not mucus, which is why you absolutely must not blow your nose for at least two weeks.
To keep your nasal passages from getting too dry, we recommend using a gentle saline nasal spray. It helps rinse away any crusting without putting any pressure on the delicate structures that are healing inside your nose. This stuffy feeling will gradually get better as the internal swelling goes down over the first few weeks.
Dr. Fater’s work in the operating room is just one half of the equation for a beautiful result. Your actions in the days and weeks after surgery are every bit as important. Think of your recovery as an active partnership—you’re the one in the driver's seat, protecting your investment and making sure your nose heals just right.
Following our post-op instructions isn't just a list of suggestions; it’s your personal roadmap to a smooth, successful outcome. This guide will walk you through everything you need to do to support your body's amazing healing process.
Your most important job right after surgery is to create a safe haven for healing. This means shielding the delicate, newly shaped structures of your nose from any bumps, pressure, or strain. That first week is especially critical.
You’ll go home with a protective shield—an external cast or splint. It’s absolutely essential that you keep this splint clean and dry until we see you for your follow-up, which is usually five to seven days after your procedure. Leave it alone and let it do its job. It’s holding everything securely in place while the initial healing begins.
"For the first few weeks, treat your new nose like a precious, fragile object. Simple, mindful actions—like how you sleep or what you wear—make a profound difference in the final aesthetic and functional result of your rhinoplasty."
You also need to be mindful of certain movements. A forceful cough or sneeze can create a sudden spike in internal pressure. If you feel a sneeze coming on, try to let it out through your mouth. This simple trick makes a huge difference in taking the pressure off your nasal passages.
While rest is king at the beginning, getting some light activity is important for circulation and reducing swelling. But it's all about knowing when and how. Pushing yourself too hard, too soon is a recipe for increased swelling, and it can even put you at risk for bleeding.
Here’s a general idea of what to expect when it comes to getting back on your feet:
Beyond exercise, a few small changes to your daily habits are non-negotiable for a great recovery. These adjustments protect the healing tissues from unnecessary stress and ensure nothing compromises your final result.
Do Not Blow Your Nose
For at least two to three weeks, you absolutely must resist the urge to blow your nose. The pressure can easily disrupt the delicate internal stitches and cause bleeding. Instead, use the saline nasal spray we give you to gently rinse and moisturize your nasal passages.
Wearing Glasses Safely
Believe it or not, the weight of eyeglasses or sunglasses can leave permanent dents in the healing nasal bones. You have to keep all pressure off the bridge of your nose for a minimum of four to six weeks. Some patients tape their glasses to their forehead or find special cheek-supported rests to get by.
Sun Protection is Essential
Your nose will be extra sensitive to the sun after surgery. Unprotected sun exposure can lead to permanent darkening of the skin on your nose and can also make swelling worse. For the first six months, make a wide-brimmed hat and a broad-spectrum sunscreen of SPF 30 or higher your best friends whenever you're outside.
https://www.youtube.com/embed/eB9zFS5nisM
While the first couple of weeks after your rhinoplasty feel the most intense, the true story of your new nose unfolds over a much longer, more gradual timeline. I often tell my patients to think of the initial healing as the broad strokes of a painting; the long-term timeline is when all the fine, beautiful details emerge to create the final masterpiece.
This extended period is really all about refinement and patience. As the months go by, the last stubborn bits of swelling will slowly melt away, revealing the delicate, final contours of your nose. It’s a subtle evolution, but it's an exciting part of the process where you get to watch your results settle in beautifully. Understanding this journey is key.
By the three-month mark, you’re in a great place. At this stage, we expect about 90% of the swelling to have subsided. You’ll feel much more like yourself, and the new shape of your nose will be clear to you, your friends, and your family.
This is what many of us consider the "socially healed" point. You can go to events and take photos with confidence, no longer worrying about significant puffiness. Keep in mind, though, that your nose is still actively healing under the surface. It might feel a bit firm or stiff, especially at the tip, but that’s completely normal.
Halfway through your first year, the changes become even more subtle. The focus of the healing process now shifts almost entirely to the nasal tip—it's always the last area to fully settle. Think of it like the skin and tissues are "shrink-wrapping" around the new cartilage and bone structure that Dr. Fater created.
During this period, you’ll start to see a real increase in definition. The lines of your nose become sharper and more elegant as that last bit of residual swelling finally dissipates. Any numbness you might have felt at the tip should also be significantly better or completely gone by now, with normal sensation returning.
The journey to your final rhinoplasty result is a marathon, not a sprint. Each milestone reveals a more refined version of your nose, with the ultimate definition emerging patiently over the full year. Trusting this timeline is essential for a positive recovery experience.
Welcome to the finish line! At the one-year mark, your rhinoplasty healing is considered complete. The swelling is gone, the internal scar tissue has softened and matured, and the final, stable shape of your nose is here to stay. This is the result you and Dr. Fater discussed and planned for.
What you see in the mirror at this point is your permanent new look. The tissues are settled, the structure is solid, and you can fully enjoy the aesthetic and functional benefits of your surgery. For so many of our patients, this is an incredibly rewarding moment. To get a better sense of what this looks like, you can see stunning examples by viewing our rhinoplasty before and after gallery.
To help you visualize this gradual process, here’s a table summarizing what you can expect in the months following your surgery.
A summary of what to expect in the months following your surgery as your final results emerge.
This timeline really helps set realistic expectations. It’s a good reminder that patience is the most important ingredient for appreciating the beautiful, lasting outcome of your rhinoplasty.
It's completely normal to have a million questions running through your mind as you prepare for your rhinoplasty recovery. Getting clear, straightforward answers is the best way to feel confident and in control of your healing process. I've put together answers to the most common questions my patients ask me, covering those day-to-day concerns that will inevitably pop up.
Think of this as your quick-reference guide for navigating the first few weeks after your procedure.
This is a big one, and the rule is firm: you have to wait. Please avoid blowing your nose for at least two to three weeks after your surgery. The force is more than enough to disrupt the delicate tissues as they heal and can easily cause bleeding.
So, what do you do instead? Use the saline nasal spray we'll give you. It’s designed to gently moisturize and rinse your nasal passages, keeping you comfortable without putting any risky pressure on the surgical area.
Numbness, especially right at the tip of your nose, is perfectly normal. During the procedure, the tiny nerves in the skin are temporarily disturbed, and it takes them a while to "wake up" and repair themselves.
You’ll likely start to notice sensation returning within a few weeks. That said, it’s not uncommon for it to take several months—sometimes even up to a year—for the feeling to be 100% back to normal. Be patient with this part of the process; it’s a standard phase of healing.
That lingering numbness is often a sign that significant, detailed work was done to reshape your nose. As those nerves slowly regenerate, the sensation will gradually fade and be replaced by normal feeling as your final results take shape.
Here’s another non-negotiable rule we have to enforce to protect your results. You absolutely must avoid resting glasses or sunglasses directly on the bridge of your nose for about four to six weeks.
The constant, focused pressure from the nose pads can shift the healing bones and cartilage. In some cases, it can even leave behind permanent indentations. For now, try taping your glasses to your forehead or look into cheek-supported rests that keep all the weight off your healing nose.
Complications after rhinoplasty are quite rare, but it's crucial that you know what to look out for. Being aware of the warning signs means you can act quickly and protect your health.
Please call our office immediately if you experience any of these symptoms:
When you can get back to your routine really depends on what your daily life looks like. Most of my patients with desk jobs or school schedules feel comfortable returning within seven to ten days, which usually lines up perfectly with when the external cast comes off.
If your job is more physically demanding and involves heavy lifting, constant bending, or straining, you’ll need to plan for more downtime. Expect to take two to three weeks off to be safe. Easing back into your activities is truly the key to a smooth and successful recovery.
At Cape Cod Plastic Surgery, my team and I are here to guide you through every single step of your journey. If more questions come up or you’re ready to talk about your goals, please schedule your personal consultation with us today.
Learn about protruding eye shape causes, diagnosis, and treatment options at Cape Cod Plastic Surgery with expert insights from Dr. Marc Fater.
July 19, 2026
Bone under eye - Concerned about the bone under your eye? Explore anatomy, causes of under-eye hollows, and advanced treatments from fillers to surgery in our

July 8, 2026
Considering skin tightening after liposuction? Explore recovery, influencing factors, and effective treatment options, from non-invasive to surgical.
Cape Cod Plastic Surgery offers expert cosmetic and reconstructive procedures in a safe, accredited setting. Led by Dr. Marc Fater, we combine advanced techniques with personalized care to help you look and feel your best.
Monday: 9:00 AM – 5:00 PM
Tuesday: 9:00 AM – 5:00 PM
Wednesday: 9:00 AM – 5:00 PM
Thursday: 9:00 AM – 5:00 PM
Friday: 9:00 AM – 5:00 PM