
Skin Tightening After Liposuction: Options & Recovery
Considering skin tightening after liposuction? Explore recovery, influencing factors, and effective treatment options, from non-invasive to surgical.
Feb 27, 2026

Proper skin care after microneedling is just as crucial as the treatment itself if you want to see that smooth, radiant glow. Think of your post-treatment plan as having three simple rules: be gentle, keep it hydrated, and stay out of the sun. Following these steps is the key to protecting your skin while it’s vulnerable, helping it heal beautifully, and getting the absolute most out of your collagen-boosting investment.
So, your microneedling session is done. What now? The best way to think about it is that your skin now has thousands of tiny, temporary doorways. While this is great for soaking up nourishing ingredients, it also means your skin is extra sensitive to irritation and bacteria. That’s why a smart aftercare plan isn’t just a nice-to-have—it’s a must for getting the results you came for.
The first few days are all about giving your skin the perfect environment to repair and rebuild. When you stick to a clear plan, you sidestep common issues like infection, unwanted pigmentation, or irritation that just won't quit. Treat your skin like the delicate, receptive canvas it is right now.
Your entire aftercare strategy really comes down to three non-negotiable actions. Get these right, and you're setting yourself up for a quick recovery and a complexion that looks better than ever.
Following a proper skin care after microneedling routine is what unlocks the treatment’s incredible power to kickstart collagen production. In fact, studies show that a series of treatments can boost collagen by up to 400% after four sessions—it’s no wonder this procedure has become so popular.
By diligently following this aftercare plan, you are actively protecting your investment and ensuring the procedure delivers its full potential. Think of it as teamwork between you and your provider—the treatment happens in our clinic, but the final masterpiece is created at home.
The right follow-up routine not only helps you heal faster but also enhances the powerful results from advanced treatments like the Genius RF Microneedling offered at Cape Cod Plastic Surgery. This is your high-level strategy for optimal healing and the beautiful results you deserve.
The first three days after your microneedling session are, without a doubt, the most critical for your final outcome. Your skin is in a powerful state of repair, and how you treat it now sets the stage for the entire healing journey.
Think of it this way: the micro-channels are wide open. This makes your skin incredibly receptive to healing ingredients but also leaves it highly vulnerable to bacteria and irritation. Let’s walk through the day-by-day plan to get it right.
On day one, your mission is simple: keep your skin clean and calm it down. You’ll almost certainly see some redness and feel a warmth similar to a mild sunburn. This is completely normal! It’s the inflammatory response that kicks off the whole collagen-rebuilding process.
For the first 24 hours, you need to resist the temptation to slather on your usual products. We'll give you specific recommendations at our Cape Cod Plastic Surgery office, but the general rule is extreme minimalism.
By the second and third day, the initial intense redness should start to subside. You'll likely notice your skin feels quite tight, dry, and maybe even a bit "thirsty." Now's the time to re-introduce a few very specific, gentle products to support this next healing phase. The focus shifts entirely to deep hydration and diligent protection.
This visual gives you a great snapshot of how your routine will evolve.
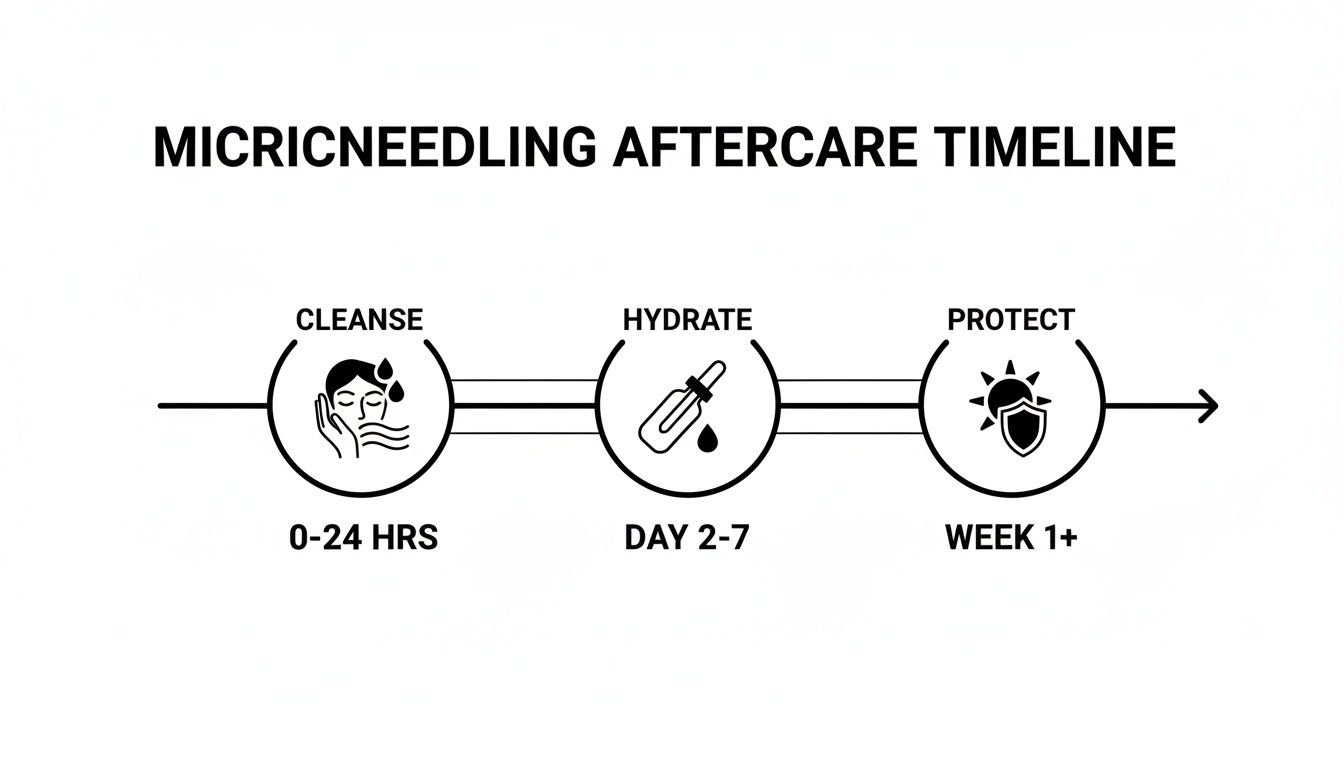
As you can see, we move from just cleansing to layering in hydration and then making sun protection a non-negotiable part of the daily plan.
This is where a high-quality hyaluronic acid serum becomes your best friend. Applying a few drops to damp skin will help it pull in and lock down moisture, which does wonders for that uncomfortable tight feeling. Follow that up with a simple, bland, fragrance-free moisturizer to seal everything in.
A Quick Word of Advice: You might start to see some light flaking or peeling around day three. Do not, under any circumstances, try to scrub it off. This is a natural, healthy part of the cell turnover process. Picking at it can easily lead to scarring or hyperpigmentation, so just let it shed on its own.
To make things even easier, here's a quick cheat sheet for those crucial first three days.
This table is your at-a-glance guide to navigating the immediate aftermath of your treatment. Keep it handy!
Sticking to these do's and don'ts will create the ideal healing environment for your skin to work its magic.
While knowing what to do is important, knowing what not to do is arguably even more critical when it comes to skin care after microneedling. Exposing your vulnerable skin to the wrong things can set back your healing and seriously compromise the results you’re hoping for.
For the first three days, you must strictly avoid:
Remember, some swelling is a common reaction. It affects between 40-60% of patients and usually peaks around the 24-hour mark. A gentle, cool compress can feel wonderful and help bring it down. And don't forget, unprotected UV exposure can sabotage up to 70% of the potential collagen benefits.
The best path forward is simple: use gentle, medical-grade cleansers and barrier-repair creams to help restore your skin's natural defenses. For those interested in the clinical data, you can read more about the efficacy and tolerability of radiofrequency microneedling to understand these findings. Following these guidelines is your best bet for achieving beautiful, long-lasting results.
Once you get past those first 72 hours, your skin’s focus shifts from immediate damage control to the crucial job of long-term rebuilding. This next phase, from about day four to day seven, is all about reinforcing your skin’s protective barrier. Think of it as supplying your skin with all the best materials to heal strong.
You'll probably notice your skin is still changing during this time. A bit of light peeling and some lingering dryness are totally normal—in fact, they're good signs! It means your skin is busy pushing out the old, damaged cells to make way for the fresh, new tissue underneath. The trick is to support this process with gentle, nourishing care, not fight it.

I often tell my patients to imagine their skin barrier as a brick wall. The skin cells are the bricks, and the lipids—like ceramides—are the mortar holding it all together. Microneedling creates tiny disruptions in that wall, and now your job is to give it plenty of mortar to patch things up. This is where your skin care after microneedling becomes so important.
Your focus should be on moisturizers packed with ingredients that actively support that barrier function. These are the ingredients that will calm things down, seal in moisture, and help your skin rebuild itself from the inside out.
For this week, your go-to products should feature:
Keep using your hyaluronic acid serum on damp skin, but now follow it up with a richer, more substantial cream. That combination of deep hydration followed by barrier repair is a game-changer for how your skin will feel by the end of the week.
If you remember just one thing from this entire guide, make it this: be absolutely militant about sun protection. Your skin is producing brand-new cells that are incredibly sensitive to UV damage. Sun exposure on this fresh skin is a direct path to developing post-inflammatory hyperpigmentation (PIH)—those stubborn dark spots that are so hard to get rid of.
Honestly, just one afternoon of unprotected sun exposure during this first week can sabotage a significant portion of the benefits from your microneedling treatment. A broad-spectrum, mineral-based SPF of 30 or higher needs to be the last thing you apply every single morning, no exceptions.
This isn't just about preventing a sunburn. UV radiation actively breaks down collagen, which is the exact opposite of what we're trying to achieve. Skipping sunscreen is like taking two steps forward and one giant leap back. And if you're outside for a while, reapply every two hours.
Around day four or five, most of the obvious redness has usually subsided, and you’ll probably start feeling ready for makeup. My rule of thumb is to wait until your skin no longer feels raw, tight, or is actively peeling. While some people are ready after the 72-hour mark, it’s really about listening to your own skin.
When you do decide to wear makeup, I strongly recommend sticking with mineral-based formulas. Mineral powders are much less likely to irritate your still-sensitive skin or clog pores compared to heavy liquid foundations.
Most importantly, the theme for this entire first week is "gentle." That means you're still avoiding:
By focusing on this simple trio—gentle cleansing, deep nourishment, and strict sun protection—you’re creating the perfect healing environment. This careful approach during the first week is what truly sets the stage for the amazing, long-term results you’re after.
After the first week or so of letting your skin heal, the barrier is much stronger and ready for what’s next. Now we can start strategically reintroducing more powerful ingredients into your skin care after microneedling routine. This isn't about jumping right back into your old products; it’s a careful, gradual process meant to boost and extend those fantastic results you’re starting to see.
Think of your skin as a freshly primed canvas. It's now smoother and far more receptive, ready to drink up beneficial ingredients more effectively than ever before. This is our window of opportunity to bring in active skincare that supports ongoing collagen production and keeps that post-treatment glow going strong.
Your first step back into the world of active ingredients should be a gentle antioxidant. For this, a good vitamin C serum is usually the perfect choice, but you absolutely have to pick the right kind and ease it in slowly.
Around day seven to ten, I recommend finding a low-concentration, non-irritating form of vitamin C. Look for formulas with Ascorbyl Glucoside or Tetrahexyldecyl Ascorbate—they're known for being much kinder to healing skin than the more aggressive L-ascorbic acid.
Taking this step helps shield your newly forming collagen from environmental stressors while brightening your overall complexion. It really adds another level of radiance to your results. To see how microneedling can be paired with other powerful treatments, you might want to check out our guide on the benefits of microneedling with PRP.
While your skin is still in this highly receptive state, ingredients that directly support cell repair and collagen production can work wonders. This is the perfect time to bring in serums with growth factors and peptides. These powerful ingredients essentially act as messengers, telling your skin cells to kick their regenerative processes into high gear.
As early as day three, you can introduce growth factor serums. Their penetration can be enhanced by an incredible 80-1000% through the skin's microchannels. At Cape Cod Plastic Surgery, Dr. Fater’s 30+ years of experience in non-invasive care ensures this approach aligns with best practices seen across the 276,069 U.S. facial procedures that make up the non-surgical market.
The guiding principle for reintroducing any active is 'low and slow.' Your skin will tell you what it can handle. Listening is the key to achieving long-term success without the frustrating setbacks of irritation.
For those looking to really maximize results and speed up skin regeneration, advanced options like Microneedling With Exosomes are worth considering, as they use powerful cellular messengers to boost the healing process.
Retinoids are the gold standard in anti-aging, and they work beautifully with microneedling—but only when the timing is perfect. Rushing back into retinol is one of the biggest post-treatment mistakes I see. Your skin needs to be fully healed, which is typically around the two-week mark, before it can handle such a potent ingredient.
When you feel ready, stick to this cautious plan:
This careful reintroduction ensures your skin builds tolerance without turning red, flaky, or angry. By patiently layering these actives back into your routine, you’re protecting your investment and building a powerful regimen that will keep your skin looking firm, smooth, and vibrant for months to come.
Microneedling is an incredibly safe procedure, but it's important to remember that we are intentionally creating a controlled injury to kickstart your skin's natural healing. So, your skin will go through a predictable recovery process. Knowing what to expect takes all the anxiety out of it, letting you focus on the beautiful results just around the corner.
Think of those initial side effects not as a problem, but as proof that the treatment is working. It’s the visual confirmation that your body's powerful regenerative engine has been switched on.
The most common thing you'll see and feel is redness and warmth, almost exactly like a mild sunburn. This is the classic inflammatory response that signals your body to start producing new collagen—it’s a great sign! You can also expect your skin to feel tight, and you might see some minor swelling, especially in the first 24 to 48 hours. This is all temporary and the very first step toward building that fresh, new skin.
Getting through these first few days is all about keeping your skin calm, hydrated, and comfortable. Instead of just waiting for the side effects to disappear, you can be proactive.
That warm, sunburn-like feeling, for example, is easy to manage. A clean, cool compress applied for a few minutes at a time can feel amazing. Just make sure you’re not putting ice directly on the skin—it’s too harsh for your vulnerable tissue.
Here’s a quick rundown of what’s typical and how to handle it:
In my experience, the vast majority of patients sail through microneedling recovery without a hitch. Still, it’s crucial to know the difference between what’s normal and what could be a sign of a complication, like an infection. We want you to feel completely confident and supported.
While some treatments like a chemical peel might involve more intense peeling, microneedling recovery should feel relatively mild and manageable in comparison.
Keep an eye out for these less common signs:
At Cape Cod Plastic Surgery, your safety and peace of mind are our top priorities. If you experience any symptoms that feel "off" or concern you, please don't wait. Call our office immediately. It is always, always better to be cautious and let us guide you.
Normal healing means you see a steady, day-by-day improvement. The sunburn look fades, the tightness gives way to a bit of flaking, and within about a week, you're looking at a much smoother, brighter complexion. When you understand this timeline, you can relax and trust the process, knowing you’re on the right path to incredible results.
Even with the best plan, you're bound to have questions as your skin starts to heal. That's completely normal. Your skin is unique, and so is its recovery journey.
To help you feel confident every step of the way, we've pulled together the most common questions we get from our patients right here at Cape Cod Plastic Surgery. Think of this as your go-to guide for a smooth, worry-free recovery.
This is, without a doubt, the question we hear the most. Getting the timing right for cleansing and makeup is crucial. Your skin is incredibly vulnerable right after treatment, and the goal is to prevent any irritation or infection.
For the first 4-6 hours, the rule is simple: hands off. Don't touch your face at all. Once that initial window has passed, you can gently wash your face with a mild, simple cleanser and lukewarm water. When you're done, pat your skin dry with a clean, soft towel. Absolutely no rubbing.
Patience is your best friend when it comes to makeup. You'll need to stay completely clear of all makeup for at least 24-72 hours. The tiny micro-channels from the treatment need time to close up, and makeup can clog those healing pores and introduce bacteria.
Once the most intense redness has calmed down, usually by day three, a light dusting of mineral-based powder is okay if you feel you need it. Hold off on liquid foundations for a few more days, and always, always cleanse your face thoroughly before bed.
The short answer here is a hard no—at least not right away. While these active ingredients are the powerhouses of a normal skincare routine, they are way too strong for freshly treated skin. Using them too soon will only lead to major irritation and can actually get in the way of the healing process.
You'll need to press pause on all of the following for at least 7 days:
We typically give the green light to reintroduce a gentle, lower-strength vitamin C serum around the 7 to 10-day mark. For powerful ingredients like retinol, you really should wait a full 14 days. When you do start it back up, ease into it. Try using it just two or three times a week at first to see how your newly refreshed skin responds.
It can be a little jarring to see your skin start to flake or peel, but trust us, it's a good thing! This usually kicks in between days three and five, and it’s a clear sign that the microneedling did its job by kickstarting your skin's renewal process. The old, dull layer is shedding to make way for the fresh, new skin underneath.
The number one rule here is do not pick, pull, or scrub the peeling skin. Messing with it is the fastest way to cause scarring, infection, or hyperpigmentation. Your job is to support the process, not rush it.
To keep things comfortable while your skin is shedding, focus on two simple things:
The peeling will stop on its own in a few days. Just be patient and let your body work its magic.
A bit of redness and mild swelling are totally expected right after microneedling. Most of our patients say it looks and feels like a moderate sunburn. This is most noticeable in the first 24 hours.
By the 48-72 hour mark, you should see a big difference. That "sunburn" look will fade to a soft pink, and any puffiness will begin to subside. It's a great sign that the initial inflammation is over, and your skin is getting down to the business of rebuilding.
If you're feeling any discomfort, a cool compress can feel amazing—just don't put ice directly on your skin. Propping your head up with an extra pillow that first night can also help bring down any swelling.
If you notice the redness or swelling is sticking around or getting worse after day three, that’s your cue to give us a call. While it's rare, it could be a sign of a complication that needs a professional eye.
Your aesthetic journey is a partnership, and our team at Cape Cod Plastic Surgery is here to support you every step of the way. If you have more questions or are ready to schedule your next treatment, please contact us.
Considering skin tightening after liposuction? Explore recovery, influencing factors, and effective treatment options, from non-invasive to surgical.
July 8, 2026
The Gold Standard in Plastic Surgery: Why Board Certification Matters
July 7, 2026
Our 2026 guide explains precisely how does botox work. Discover its science, procedure, benefits, and risks in simple terms to see if it's for you.
Cape Cod Plastic Surgery offers expert cosmetic and reconstructive procedures in a safe, accredited setting. Led by Dr. Marc Fater, we combine advanced techniques with personalized care to help you look and feel your best.
Monday: 9:00 AM – 5:00 PM
Tuesday: 9:00 AM – 5:00 PM
Wednesday: 9:00 AM – 5:00 PM
Thursday: 9:00 AM – 5:00 PM
Friday: 9:00 AM – 5:00 PM